
Blazor Hybrid: Getting Started Using Blazor with WPF
However, this article will get straight to the point and provide a guide on getting set up, using parameters, and more!
Project Setup
The minimum requirements to use Blazor Hybrid with WPF are:
- .NET 7 or greater
- .NET Framework 4 or greater
- Visual Studio 2022
- .NET Desktop Development workload
To create your new project, use the WPF Application template, and follow the steps in the wizard. It’s important to note which version of .NET you used. In the video above, I am using .NET 9.
Once your application has been created, you will need to install 2 different NuGet packages:

For the WebView package, be sure that you are installing a version that matches the version of .NET you used when starting the project. For example, in the video demonstration I used .NET 9, so I installed version 9.0.50 of the WebView.WPF package. We have other client projects on .NET 8, in which case we are using version 8.x.x.
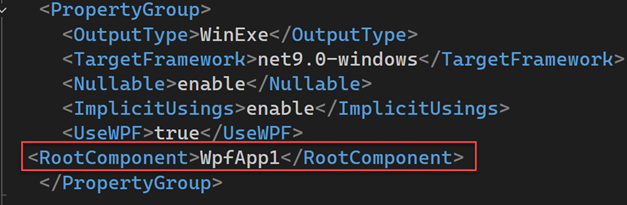
After installing the NuGet packages, the next thing to do is update the .csproj file. The WPF project template has the Project using Microsoft.NET.Sdk. You need to let the project know you will be utilizing razor files by adding “.razor” on the end of the SDK property.

At the time of writing this, you also need to add in a <RootComponent> element within the project <PropertyGroup>. Give the root component the same name as your project. According to Microsoft tutorials and Github issues, this is a workaround for an issue where the RootComponent is not getting set properly during build, however it seems to have been issue since 2022 and was still in the backlog in 2024 (its now spring 2025), so I don’t particularly think it will be fixed soon. Regardless of that, we need to add it in!
Next you will need the wwwroot folder with an app.css file and an index.html file. In the index.html you want the following markup, with a special emphasis on the blazor.webview.js script:
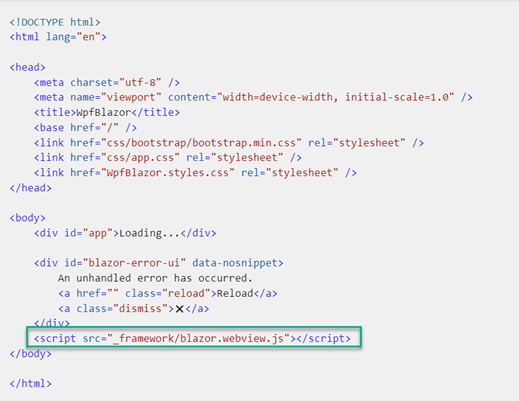
Blazor Hybrid won’t work without the blazor startup script. As the css file will mostly be customized to your css needs, it’s not too important what you put here, but here is some example css if you would like it to get started. The highlighted part is everyone’s favorite Blazor yellow error bar of doom:
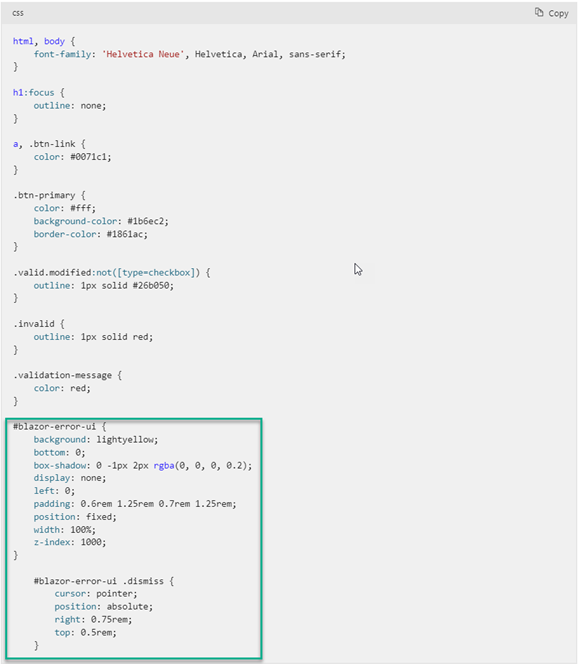
![]() (error bar of doom)
(error bar of doom)
Next step is to add the two razor files! First is an _Imports.razor with a @using statement for the Microsoft.AspNetCore.Components.Web package. That’s all you need in the _Imports for basic setup.

Second is your razor component that you would like to use in the WPF project. For this example I’ve just used the template razor component file and customized the header.
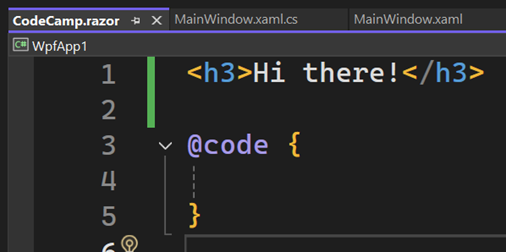
With that, setup is complete!
Putting It Together:
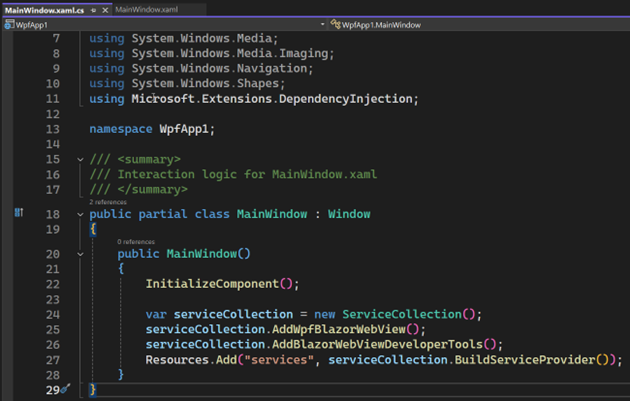
Now that the setup is done, you just need to put it all together. Start by opening the MainWindow.xaml.cs file. Add in a @using statement for the DependencyInjection package.
You will see the file constructor, and within it is the InitializeComponent() call. Every change made to this constructor as we go through everything will take place after InitializeComponent().
Initialize a new service collection, and then add two services to it, AddWpfBlazorWebView() and AddBlazorWebViewDeveloperTools(). The WebViewDeveloperTools aren’t necessary for your app to run, but really useful for troubleshooting! Once you have done so, add the service collection the Window’s Resource object. In WPF each Framework/FrameworkContentElement has a resources property, which is a ResourceDictionary type with defined resources in it. Each resource needs a unique key, typically a string, and you can access it that way. Here, our key is “services”.
Those are all the changes necessary on this file. Next, open up the MainWindow.xaml file to finish this up!
Within MainWindow.xaml, there are several properties that begin with “xmlns”. “xmlns” stands for XML Namespace. These properties are defining namespaces that you will be referencing in the UI, and many are added by default. We only need to add one more! Insert another within the <Window> element tag called xmlns:blazor. You will set it equal to:
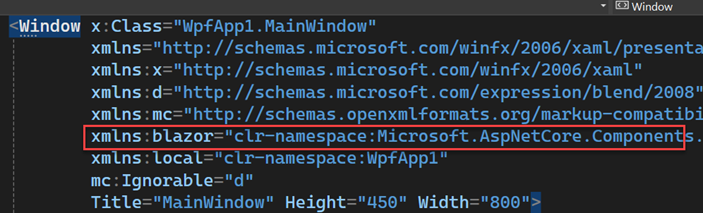
“clr-namespace:Microsoft.AspNetCore.Components.WebView.Wpf;assembly=Microsoft.AspNetCore.Components.WebView.Wpf”
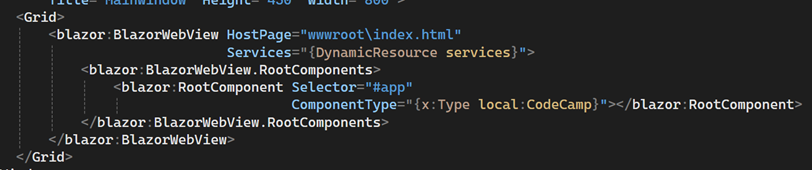
Next you will insert the Blazor into the UI and you’re done on this file! Create a new element tag using the blazor xmlns you added the step prior. The top level will be <blazor:BlazorWebView>. On that tag, you will tell it where it can find the HostPage (your previously created index.html file) and the Services it needs to run. The Services property will use the key you set for the service collection in the xaml.cs file, which was “services” (if you named it the same as I did).
Within <blazor:BlazorWebView>, add another element for <blazor:BlazorWebView.RootComponents>. This element doesn’t need anything added to it.
Within that <blazor:BlazorWebView.RootComponents> element, add another one! This one will be <blazor:RootComponent>. You will need to add a Selector property for this to run. In the example I’ve used the genius name “#app”, but you can call it whatever you would like, with the # symbol. After that, you will specify your ComponentType, which is the razor component you added to the project earlier. Bind ComponentType using x:Type (similar to C#’s TypeOf() operator) to the local namespace. Then it just needs the razor component name!
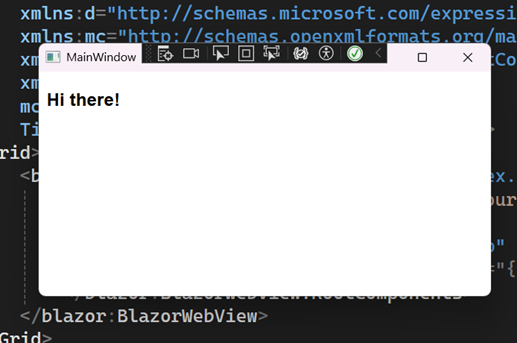
You’re app is now ready to be run! Start it up and you will see your razor component in the WPF Main Window.
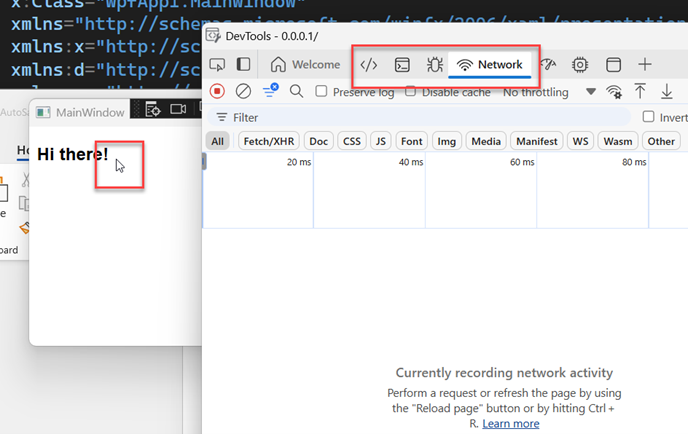
One more important thing before moving on to more advanced usage. Remember way back in setup when we added BlazorWebDeveloperTools() to the service collection? Your WPF application will look exactly the same whether you added them or not, so it’s difficult to remember if you’ve set them up. To open them, put your cursor over the Blazor section of the page and hit ctrl+shift+I. The WebDevTools will open up! You will be able to use the usual browser tools like the network tab, the console, and the elements/css tab. This is a helpful tool for troubleshooting!
Now that you’ve started an app from scratch, you can do some more advanced things that will really help your projects.
App Expansion:
As developers, our applications frequently need to be much larger and more complex then they are in a demo/tutorial. In this instance, that involves using Blazor within multiple WPF Pages/Windows, in which case it would become rather annoying to have to initialize the services on every code behind page. Instead, you can initialize them once and use them throughout the whole application.
To do so, you will need to install the NuGet package for Microsoft.Extensions.Hosting. In the App.xaml.cs file, add in a using statement for that package. From here, create a public static variable of type IHost and initialize it to default! . In the example below, I’ve named it “AppHost”:

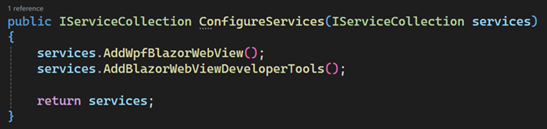
Next, create a public function called ConfigureServices with an IServiceCollection parameter, and return type of an IServiceCollection as well. Within the public function, you will add the two Blazor services (AddWpfBlazorWebView() and AddBlazorWebViewDeveloperTools()) to the IServiceCollection parameter.
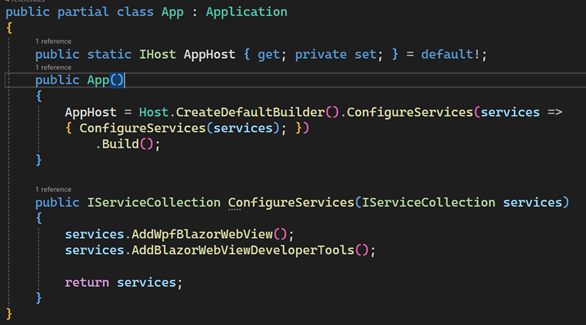
Finally, within the App constructor call the ConfigureServices() function when you setup the DefaultBuilder.
The CreateDefaultBuilder() function on the Host initializes a new instance of the HostBuilder with pre-configured defaults (which now includes your Blazor services). HostBuilder is a program initialization utility.
Here’s the final App.xaml.cs file after completing each step:
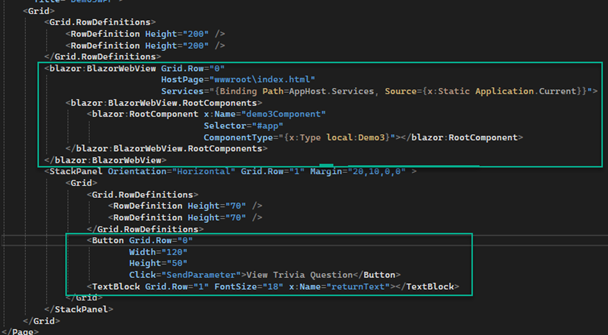
Next, you will need to tell the blazor:BlazorWebView elements in each WPF page how to find the services. This setup is a little different than the initial demo. Instead of setting up the Services = {DynamicResources services}, you bind the Services property to AppHost.Services. You will also add in a Source property set to the static Application.Current. Here is an example:

With these steps, you can now access the Blazor services throughout your WPF application.
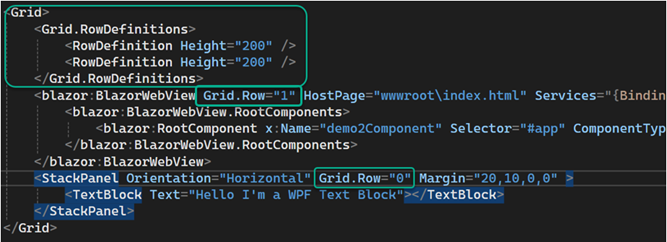
Another useful development feature here worth mentioning is that you are able to use both WPF controls and razor components within one page, you are not restricted to one or the other. You can add your razor components using standard XAML markup. Here’s an example where I’ve used the XAML grid and it’s row definitions to add in both a razor component and a text block:
Sharing Data:
Finally, we will look at how to share data between the razor component and the WPF page. We will start with the most basic way to share data, which is by using parameters. Starting on the razor component, add a parameter or two to your component as you normally would. In this example we’ve named them Question2 and Answer, as I was using a trivia question in my demonstration.

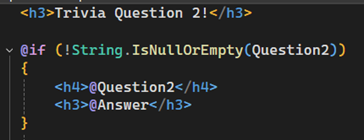
Both parameters are strings, however you can do more complex object parameters as well. In the markup, I used both the parameters, but only show them once they have been passed in:
Heading over to the WPF side, you will first make an addition to the XAML file. On your <blazor:RootComponent> tag, name the element. In this example I have named it the very clever “rootComponent”.

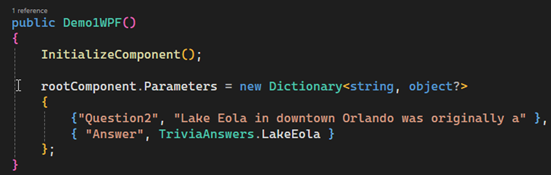
Once this is done, you are able to reference the element in the code behind file and add parameters! Parameters are required to be a Dictionary type of string and nullable object, but you can pass the value in the format you would like. The key for each dictionary entry will be the name of the parameter you established on the razor component, so you can see here that they are also called Question2 and Answer.
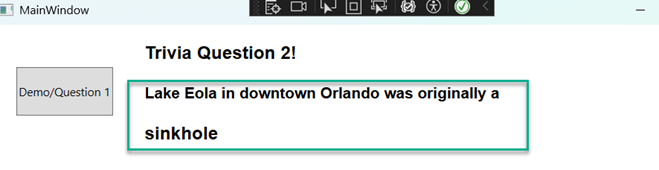
Now when you run the app, your parameters will pass through to the razor component and display on screen.
This is a straightforward example, but frequently we need to send data both ways, which is what we will look at next. This piece is great, because with the Angular/Blazor components you are not able to send data back to Angular, so I was very excited about this!
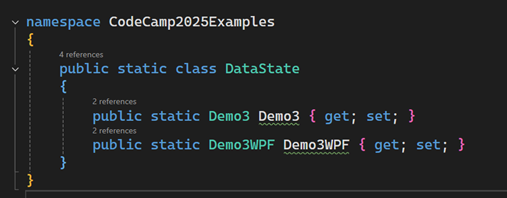
There is a lot of back and forth here, so I will have lots of screenshots and a little diagram to help explain it. The first thing to do is create a new class in the app. For this example, I’ve called it the DataState class. This class contains a reference to both the WPF Page and the razor component. These are the only two properties you need in it!
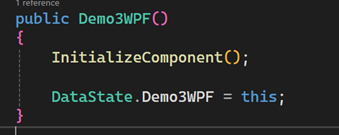
From here, return to the XAML code behind file. After the call to InitializeComponent(), set the reference on the DataState class equal to the current instance of the WPF page using the “this” keyword.
You’re going to do the same on razor component, however here you will make the initialization in the OnInitialized lifecycle event.
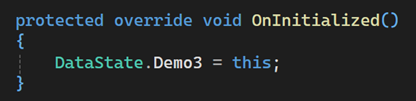
After this is done, both the WPF page and razor component will be registered in this go-between class.
Now that you’re set up, here is a little chart to help explain how it’s going to work.
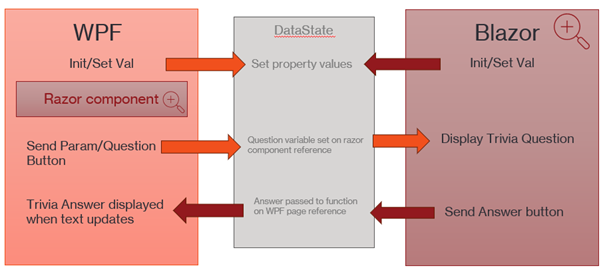
The WPF Page has a button on it that will send the parameter into the Blazor. The razor component will display that parameter once received. When the razor component displays the parameter, it will also display a button. When that button is clicked, it will send the a string back to the WPF page, which will in turn display there.
In more simple terms:
- Click WPF Button.
- WPF Button sends parameter to razor component
- Razor component renders the parameter and reveals a button
- Click Razor component button
- Razor button sends string parameter back to WPF
- WPF page displays the string
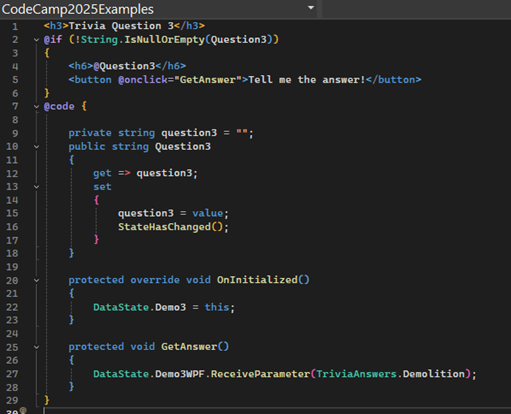
Now let’s look at the rest of the setup, starting with the razor component. In the UI is a header that is visible all the time, along with a header and a button that are visible when the Question3 parameter has a value.
The Question3 parameter is set up so that when the value changes, StateHasChanged() is called, which lets the UI know that something has changed and it needs to re-render.
Finally, the component has a function that is called when the button is clicked named GetAnswer(). The GetAnswer() function references the DataState class and calls a function on the WPF Page called ReceiveParameter().
Over on the WPF Page, there are a few items on the UI. First, I have the Blazor piece, set up in the same manner as earlier. There is also a StackPanel with a button and a text block. The Button calls a function on click named SendParameter(), and the text block has a name of “returnText”, which is an important piece of the process.
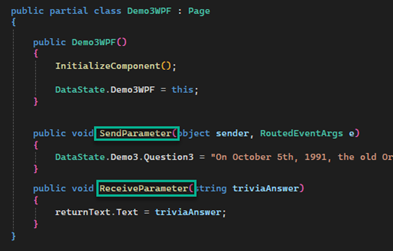
In the code behind, there are two functions, SendParameter() and ReceiveParameter(). SendParameter() references the razor component on the DataState class and sends a trivia question to our Question3 parameter.
The ReceiveParameter() takes in a string, and then programmatically sets the named text block value equal to the incoming string.
That’s all the setup on this – here’s a fun .gif of the demo (apologies for the lack of css..)
(You can also view me talking about this at 34:28 on the YouTube video)
The gif cuts it off, so if you’re deeply invested in this trivia question, the correct answer is…Lethal Weapon 3. For fun, here’s a link to the scene: https://www.youtube.com/watch?v=Wue5QQrg5Fs
This DataState class example is a really simple solution for sharing data back and forth from another tutorial I used to help me learn this. I do want to point out that this is for a simple application, and as your app grows this DataState class could get messy. A potentially better pattern would be to turn it into a service, use the dependency injection package we installed earlier to inject the service, the share data via a service instead.
Wrap Up:
Hopefully these 3 demos helped you understand how get started with your WPF and Blazor Hybrid app! It just takes a little bit of setup and some attention to things like element naming, parameter naming, and package versions to get off the ground. This was a challenge but exciting to execute for me, and I hope you learned something new!